I’m the inquisitive type. I’m interested in finding out how things work. Sometimes out of curiosity and as an IT professional, more often than not, out of necessity to prevent bad things from happening.
Introduction
I became interested in WordPress as a result of a project I was working on for Eastside Legal Assistance Program (ELAP). They wanted to expand their Social Media outreach, so I created a blog and got an associate to establish a Twitter account and Facebook page. I’m interested in content or to put it a different way, producing something that is useful, informative and serves a purpose. I guess that expresses my feelings about Twitter and Facebook. Blog – good. Facebook, Twitter – not so much.
After some quick research, I settled on WordPress. I did the usual thing and signed up for the free account on wordpress.com. It was a bit awkward at first getting up to speed. I had new lingo to master, navigation to learn and I had to keep remembering to spell check and read, re-read, re-read, re-read before pressing the “update” button.
At about the same time, I was going through the course catalog on Lynda.com and found a few WordPress offerings. One of them was called “WordPress Essentials.” The presenter is Morten Rand-Hendriksen. Morten created and delivered an excellent series using the current twenty-ten theme supplied by WordPress. The theme is pretty vanilla but that’s what makes the course easy to follow. Morten creates WordPress sites, so he has a lot of valuable experience to call on. (I have to say that an investment in a subscription to Lynda.com pays for itself after the first course.)
After creating a few posts and taking some time to reflect on the experience, it occurred to me that it didn’t seem natural to redirect people from our web site, www.elap.org, to eastsidelegal.wordpress.com. I called Drizzle Internet our Seattle-based ISP to see if they supported a self-hosted WordPress site. Fortunately they do and so now ELAP’s blog is now blog.elap.org residing on one of Drizzle’s Linux boxes.
WIIFM or What’s In It For Me?
Well, if this works for someone else, then it’s time for me to get Level7Technology Group on board. The result is this WordPress self-hosted blog site at GoDaddy.com. I hear some people complaining that GoDaddy is a terrible ISP. I think they are fine. Every time I’ve called and talked to a support technician, they have listened, understood, explained, and solved my problem. What more can you ask for? People in Hell want ice water! A word of caution; they are experts in customer service AND masters of the sales upsell. Leave no money on the table or it will be spent!
Setting up WordPress is simple and straight forward. You basically go to the link that GoDaddy provides and start the installation. I suggest placing the blog in a virtual folder after the web site’s name ,”yadayada.com/blog” or you could put it as the third level in your domain, “blog.yadayada.com.” Next, remember the name of the MYSQL database and the logon credentials for the database and the blog. VERY IMPORTANT!
Backup, Restore, Migration
You also get two very important tools: PHPMyAdmin for managing MYSQL and FTP or File Manager from the GoDaddy Control Panel. Both of these are the main tools to use in a Backup/Restore or Migration scenario. I’m going to describe my experience in making a copy of my GoDaddy production blog and installing it in my development environment. After all, a migration is the same as a Backup/Restore except to a different location.
My development environment
I have but one computer:
Intel, Core 2 Duo CPU E8400 @ 3.00GHZ; 8GB RAM; NVIDEA GeForce 8400GS, 256MB RAM; 1 ASUS DVD R/W; 2 ACER X203H (inexpensive) flat panel monitors; 1-100GB SATA; 2-150GB SATA; and 3-465GB SATA drives.
The 3 smaller drives host my Personal and Development Windows 7 Ultimate systems. The 100GB drive hosts a copy of Windows 2008 Server with Hyper-V and the 3 465GB drives hold my Hyper-V world of servers, clients, evaluations, proof of concept domains, and implementations.
Buried in the Windows 7 development computer is XP-Mode. XP-Mode is implemented as a virtual PC with Windows XP/ SP3. It’s intended for those legacy, must-have applications that just won’t work under Windows 7. I use it as a test bed for multiple browsers, applications and an alternate client to connect to whatever I’m working with on the host.
My WordPress Development Environment
My development/test WordPress installation is on my XP-Mode virtual PC implemented as a WAMP (Windows, Apache, MySQL, PHP) stack. Find out more about WAMP at the Wikipedia site.
You can download and install WAMP from www.wampserver.com/en.
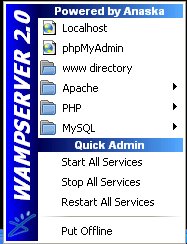
After you install WAMP, the WAMP control panel will appear minimized on the toolbar. Right -mouse click to bring up the console and make your choices as shown.
Go to the WordPress.org web site to download and install WordPress. At this writing the current version is 3.0.4 and they’re working on a v3.1 RC 2. Once you install WordPress, you will be notified of future software updates. Naturally, you’re warned to take backups of your working site before updating.
WordPress will be in a folder that you named when you created the site. At GoDaddy, I made a virtual directory called “blog” and the site is in a folder called “blog.”
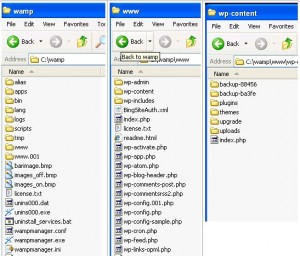
The self-hosted file structure is shown to the right.
The root folder for the site is in the “wamp” folder. Nested below this in the “www” folder is the WordPress collection. Within that collection is the “wp-content” subfolder. The “wp-content” subfolder contains all of the information that pertains to your site. When installing WordPress, you will be required to modify the wp-config.php file.
You’ll get instructions of what to do in the installation. The wp-config.php file contains the information about your installation, the name of the database, and the credentials you used in setup.
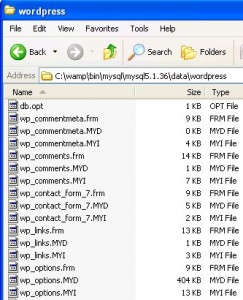
The MySQL database is in the WAMP\Bin folder as shown on the left.
Backup
You can back up your content in one of two ways. The first way is to make a copy of the wp-content folder and the wp-config.php file. That is your site’s web content backup. You can re-install WordPress and replace the wp-config.php file and the entire wp-content folder and you will have recovered your WordPress web site.
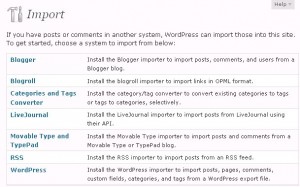
The second method is to use the Export and Import tools provided out of the box. You will use the Export tool to export the content out of your site, and then use the WordPress Importer plug-in to get your posts and comments back onto your site.
The database needs to be backed up as well. Again, there are many plug-ins available. Morten mentioned WordPress Database Backup in his course. I’m using that tool. You can schedule a backup to run periodically or run immediately. You can attach the file to an email message or save it to your computer.
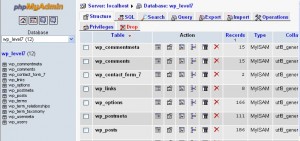
As an alternative to the plug-in, if you have access to the PHPMyAdmin program, you can create your own scripted backup using the Export tab and the Import tab to process the file you’ve exported or the WordPress Database Backup file you created with the plug-in. You can start PHPMyAdmin from the WAMP control panel.
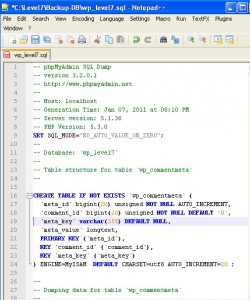 The scripted backup files contain SQL statements, such as DROP TABLE, CREATE TABLE, INSERT, or UPDATE along with the values in the database corresponding to the columns defined in the table schema.
At this point you’re done.
Restore
In order to recover from a catastrophic event, just install WordPress from scratch, replace the wp-content folder and the wp-content.php file with your back-up copy. Or use the Import tool to restore from the files created by the Export tool.
Once the content is in place, log on to the database using the PHPMyAdmin console. Under the “Import” tab, type the name of the file you created as a result of the Export procedure.
Migration
If you are migrating to a development environment, chances are very likely that you will need to edit the values in the database as they have embedded URLs that refer to files in your production blog. You don’t care about URLs that refer to sites external to your domain. You don’t want to be testing functionality on your test domain (testblog.myblog.com) and then find yourself on a page in your production domain (blog.myblog.com).
How do we do this? We edit the table values referring to our production domain and change them to our development domain. You can do this any number of ways. Perhaps the easiest is to open the backup file (.SQL) and edit it with Notepad or Notepad ++ replacing the URL with the appropriate one. I’m running in a virtual XP computer. My domain in this case is “localhost” so I replace “level7techgroup.com” with “localhost”. Since all of the database values are included in this file, it’s a one time operation. When you’re done, use this file in the Import operation. Your world is now constrained to the “localhost” world. When you bring up your blog it’s just “http://localhost” and “http://localhost/wp-admin“.
That about covers it. To summarize:
Backup
Make a copy of the wp-content folder and the wp-content.php file and/or use the Tool-> Export function from the Dashboard. Backup the database using the WordPress Database Backup Plug-in or use the Export feature of the PHPMyAdmin console.
Restore
Use the Tools-> Import functionality to restore content or replace the wp-content folder and wp-content.php files. Use the PHPMyAdmin console to import the backup file that was created by the console’s export function or use the file created by the WordPress Database Backup Plug-in.
Migrate
Restore the content as described previously. Before restoring the database, use a text editor to replace all instances of your production domain name with your test domain name, or wherever you are migrating your site to and from. Use the PHPMyAdmin console to import the modified file.
This posting is provided “as is” with no warranties, guaranties or any rights whatsoever. All content is based on the author’s experiences and opinions and is not intended to influence the actions of the reader.

This is a great post! I think I could go out and do this myself now with these detailed instructions. Thank you! (BTW, I’m a devotee of Lynda.com as well–what a deal it is!)
Thanks again–your fan,
Zoe
It’s fantastic that you are getting ideas
from this post as well as from our argument made at this place.