
Sometimes moving, upgrading, migrating – call it what you may – an infrastructure application from one major release to another proves to be a tedious process. In the case of Veeam Backup and Replication, for my involvement, it wasn’t so bad. This is the way I went about it.
Some history.
I originally deployed Veeam Backup and Replication v6.5 in a VMware environment on Windows 2008 R2 platform. The virtual infrastructure is based on the VMware 4.5 platform with ten Linux hosts supporting over 300 virtual machines.
The B&R server is on a Windows 2008R2 Virtual Machine configured with 8 vCPU, 16GB of RAM and a 60GB vDisk OS drive and an ancillary 40GB vDisk drive for the NfsDatastore and the VBRCatalog. The proxy infrastructure is deployed on Windows 2008R2 Core servers with 8 vCPU, 16GB RAM and a single 40GB vDisk OS drive. Two terabyte vDisks are added to the VM configuration to act as Veeam repositories. Server core works well as there are no moving parts to a Veeam proxy server.
Step 1 – Upgrade version 6.5 to 7.0.
When Veeam announced v7, I waited a few months for things to settle down, after all, this version introduced Tape as a backup medium, increased compression and multi processing. As with any new major release, in a few months came Patch 1 and then Patch 2. It was now time to take the plunge and upgrade to v7.
Installation went smoothly as we used the existing Windows 2008 R2 servers. As part of the upgrade process, the first time you launch the B&R console, it prompts you to upgrade the other servers defined in the Veeam infrastructure. This is a nice feature saving you the time and effort of visiting each machine in the infrastructure.
Step 2 – upgrade the database.
Shortly thereafter, our DBA initiated a project to upgrade all databases to SQL Server 2012. The SQL infrastructure is virtualized using Windows Always on Availability Group (AAG) as the equivalent High Availability (HA) alternative to Windows Server Failover Clustering. It’s really not possible to virtualize a failover cluster – actually you can do it if you use Raw Disk Mapping (RDM) or shared virtual disks. Basically, the way to do it is to create the SQL server data disks using separate vDisks on one server and on the other add the vDisks defined on the first server to the second VM configuration in the same order in which they were created on the first server. Note that the disks are only visible on the active node. This is typical Windows Failover Clustering where the disks are pard of the cluster resources.
The database migration went smoothly. To do it, simply take a full backup of the VeeamBackup database or better, have your DBA perform the task. Copy it over to the server running SQL 2012. Create the VeeamBackup database. Assign Logins and permissions that are the same as on the old SQL server. This is important as the security from the old SQL 2008 server does not carryover to the new one. Restore the backup of the database and it’s automatically upgraded to SQL 2012.
Step 3 – reconnect Veeam to the database.
Oh, but how does the B&R server know that the database has been moved? It doesn’t, so you need to modify the Registry to change the connection string.
Run Regedit to change the Database location which is \\HKLM\SOFTWARE\Veeam\Veeam Backup and Replication\. You see that below.
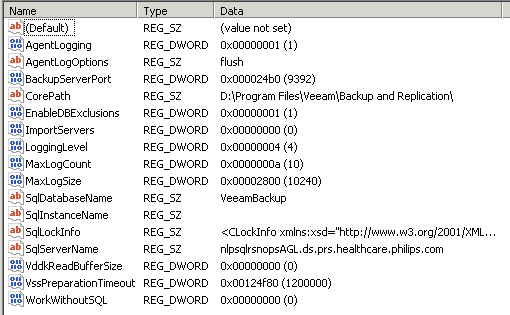
Change the “CorePath” value to match where the binaries are located.
Change the SQLServerName aka the “connection string” to the virtual IP of the AAG presenting the database.
Next, change \\HKLM\SOFTWARE\Veeam\Veeam Backup Catalog\
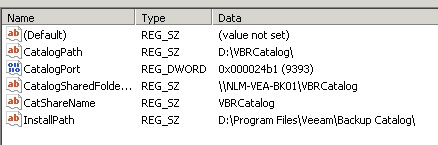
Insure that the above named values are consistent with your environment.
Step 4 – move to the Windows 2012R2 server platform.
Now it’s time to migrate to the Windows 2012 R2 platform. I was fortunate to be spared the absolute pain in the ass experience of using Windows Server 2012. Feel lucky if you have been fortunate to escape.
I created new Standard edition servers, as replacements for the Windows 2008 R2 proxy servers. The B&R server is still running on Windows 2008R2. In the B&R console, remove the existing repositories and the proxy servers. Make sure the servers are removed from the Windows section of the Veeam Infrastructure. Add the new servers as Windows servers then as Proxy servers. In vCenter, remove the repository vDisks from the VM configuration of the Windows 2008R2 servers and add them to the replacement Windows 2012R2 VM configuration. Login to the Windows servers and make sure you bring them online and that they are functional with files intact.
Back in the B&R console, add back the repository storage to the proxy servers and Import the backups. The folders and backups appear in the Imported Disk section of the Backup section. To reconnect storage with the jobs, edit the job. In the Storage section, select the appropriate repository then click on “map backup” link and select the appropriate folder representing the storage used by the job. The backup will be activated and the entry will be removed from the Imported Disk section.
I ran with the new proxy servers for a few weeks. I found that the jobs ran faster with the same virtual resources that were previously assigned to the Windows 2008R2 servers. With 8 Virtual CPUs I was seeing 4 concurrent jobs running. Quite impressive.
Step 5 – move Veeam B&R console server to Windows 2012R2.
Now it’s time to introduce the Windows 2012R2 server as a replacement for the Windows 2008R2 B&R console server. The server name is baked into the VeeamBackup database. It is either a GUID and/or hostname. Essentially it ties the B&R server to the database. In the previous operation, the database was just moved to a new SQL server and all that was required was to change the connection string on the existing server.
We have a policy of creating new servers which will have a different IP address and name from the old server. This is not an issue when replacing proxy servers as Veeam jobs understand which repository to use and the repository is assigned to a proxy server. So which proxy hosts a repository is immaterial from the stand point of a backup job.
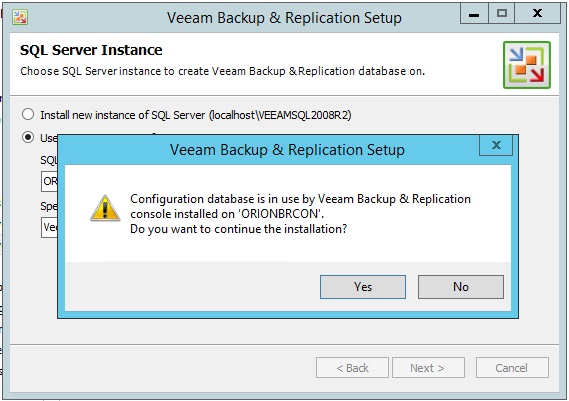
New server new Veeam software installation on the new server which means starting from scratch with the version 7 ISO. The setup program will allow you to connect with an existing database but setup will throw an error when the server name doesn’t match what is in the database.
What to do? Here’s one course of action. Logon to the old B&R console. Backup the database configuration to one of the repositories. Actually you should have set up automatic backups. This is done on the Options section under Configuration Backup. The default is daily at 10AM to the Default repository which is by default c:\backup. This is not a good place to store it so change it to a repository if you haven’t done so by the time you finish reading this. The configuration backup has a .ecb extension and to my knowledge has all of the job and history data in it. If you restore from one of these backups, to an empty database, you will see it populated wit the infrastructure and jobs.
I gave it away. That’s one method: install B&R creating a new database and then restore a configuration backup. Of course you will need to get the backup over to the local drive on the server. You restore it from the Options page from where you set up the backup.
Taking the long way and continuing on with the first method, uninstall Veeam from the old server. This will remove the server-database connection. Run the B&R setup program on the new computer. And connect to the existing database
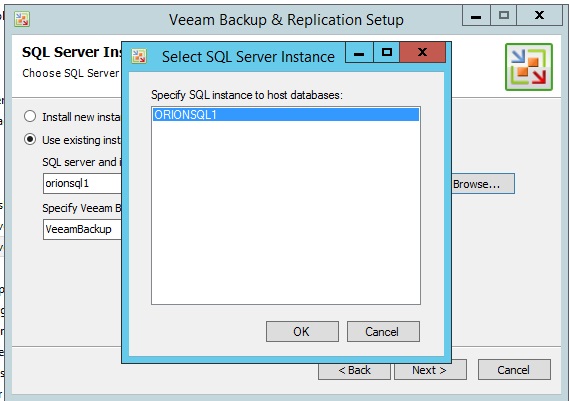
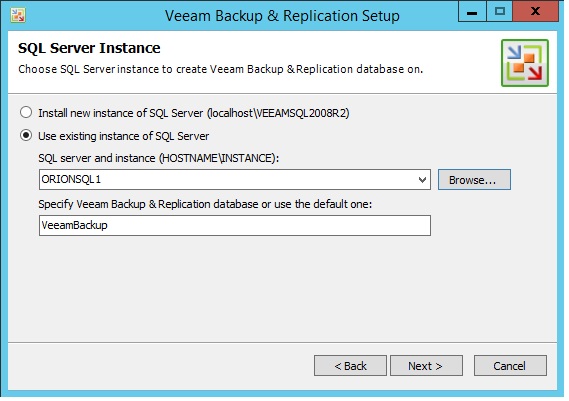
Choose to use an existing instance. Setup will ask to verify that you want to use this one. Continue with the installation.

Gotcha! There is no way to slip-stream the patches with the original ISO. Using the original ISO creates a version mismatch.
Here’s a solution. Revert the configuration database version, install Veeam Backup & Replication, and then apply the latest patch.
To allow installation with the existing database, the table dbo.Version must be set to the version contained in the installer. In my instance, it was 7.0.0.690:
Change the DB version property. Run SQL Management Studio as the identity of the Active Directory account that runs the Veeam service.
- Expand “Databases”
- Right-click “VeeamBackup” — > New query.
- Paste the appropriate query (below) and press “execute” or F5.
Use VeeamBackup
UPDATE [Version] SET current_version = 1179
After installing the 690 version of Veeam, execute the query to change version again. Run the following query prior to applying Patch 4.
Use VeeamBackup
UPDATE [Version] SET current_version = 1200
Install Patch 4. Start the B&R console. The off-host repositories show unavailable because the configuration backup does not contain the passwords. Uninstalling Veeam on the old server erases the passwords from the database during the removal.
Interesting to know that the data without passwords is in a backup or in a database disassociated with the old server. To fix this, just need to go to the properties of the proxy servers and enter in the passwords and the repository will again be recognized when you perform a scan.
Conclusion.
This is the end of the story. Veeam is upgraded from version 6.5 to 7.0. The database is migrated to a SQL 2012 platform. The entire server infrastructure is moved on to a Windows Server 2012R2 platform. What’s next? Veeam Version 8. Stay tuned.
This posting is provided “as is” with no warranties, guarantees or rights whatsoever.